Category Archives: Cooking

On the Annual Zucchini Panic

I’m not sure why people who don’t like zucchini grow so much of it. Is there a law that if you have a garden, you are required to grow zucchini in it? Is the human race so improvident it can’t absorb the information that a couple of zucchini plants are QUITE ENOUGH to supply a medium-sized family with zucchini for the season? Has the word of zucchini overreach, both in number and size, not been amply disseminated among the American people? I am 56 years old and since I was old enough to read newspapers, every August brings not only local tomatoes and zucchini and peaches to the temperate regions, but also multiple articles griping about zucchini excess. My very own neighbor once offered me “some medium-sized zucchinis” and then dropped by a bag containing four squashes the thickness of softball bats. We should declare Zero Zucchini Growth (ZZG) a national objective.

Oh yeah, you probably want some advice about zucchinis. Which I enjoy, because I don’t grow them. You too can enjoy occasional rather than epidemic zucchini.

  1. Don’t grow zucchinis. Farms and supermarkets exist.
  2. If you have to grow them, harvest them early. I know they hide behind their foliage and stealthily grow into zeppelins: get in there and move the leaves around to catch them before they can do that.
  3. If you already grew them, and you have the tender little zucchinis, you can do practically nothing to them. Thinly sliced zucchini sauteed in a pan with olive oil and a cut garlic clove is a perfect dinner side dish. Brown it a bit for the best flavor.
  4. Shredded, salted zucchini is a useful element in all kinds of dishes, as well as all by itself.
  5. Zucchini is disgusting raw. I will not be taking questions.
  6. If you have one of those god-awful huge zucchinis, and you don’t want to compost it, you can hollow it out, stuff it with its own guts plus a lot of cheese and garlic and crumbs, and bake it. This isn’t healthy at all, but it’s tasty in the way that anything else stuffed with cheese and garlic and crumbs is.

If you have lots of zucchini, and you haven’t tried shredding it (a food processor is easiest, but you can also grate it on the big holes of a box grater), here are some ideas. One of them is the Smitten Kitchen Zucchini Butter Pasta, which you should probably try even if it’s a bit fussy. It’s having a moment right now. I will comment that when I made it, the zucchini did not fully dissolve into anything resembling butter–or is that not implied by the name? I imagined a lake of green buttery sauce enveloping the pasta, which did not happen, but maybe it just means “sauce with zucchini and butter.” This is fine with me, because no one in my household screams at the sight of a zucchini shred. If you’re stealth-nourishing your small children it’s possible you want to grate it finer.

As the source for this recipe, Deb of Smitten Kitchen references a Julia Child recipe for grated zucchini sautéed with butter and shallots. This interested me, because my grandmother, a crony of Child’s who often used her recipes, regularly made a sautéed shredded zucchini recipe without any shallots at all. You can, of course, use any seasoning you like, but the grandmaternal ur-zucchini is seasoned only with salt, pepper, and nutmeg. If you haven’t had nutmeg in zucchini you should get on that. It’s also the best seasoning for green vegetables that go in quiche, and for grated zucchini that’s used as a lasagna layer (see below). Trust me, it’s up there with tarragon and chicken as an unexpectedly magical combination.

To make the simple sauté, you just need to:

  1. Grate three small or one large zucchini into a colander (in the sink, it should go without saying, if you don’t want a counter flood).
  2. Salt it with a heavy hand and toss it around.
  3. Leave it for 30 minutes, then pick up handfuls and squeeze out the moisture. I used to faithfully put a weighted plate on top, but it’s unnecessary. You want the squeezed handfuls to be able to form a cohesive ball on one side of the colander.
  4. Melt a couple of tablespoons of butter in a big skillet and saute the zucchini shreds for about five minutes. Season with nutmeg, salt, and pepper. (You can use olive oil, but butter is better.)

To make the lasagna layer, just replace whatever layer you were going to put in your lasagna with the shredded, uncooked zucchini, sprinkling it (as above) with salt, pepper, and nutmeg. It will cook as your lasagna cooks.

I’m not going to tell you how to make zucchini bread. First of all, every goddam newspaper column on the subject suggests this. Second, zucchini bread doesn’t use more than a couple of cups of zucchini. I mean go there if you want, but you’re really just making muffins, not disposing of significant zucchini, and zucchini bread doesn’t even taste like zucchini. It is also an inferior alternative to pumpkin bread.

Now stop growing zucchini. Really. And then we can start treating it as a pleasant and desirable vegetable companion rather than an invasive species.

Sourdough Sans Levain

Since I’ve owned a sourdough starter I’ve tried a number of recipes, all of which call for you to create first the starter, then a second leavener based on a small amount of that starter. It adds up to a lot of fuss, and, if you’re a working-away-from-home person, timing worries.

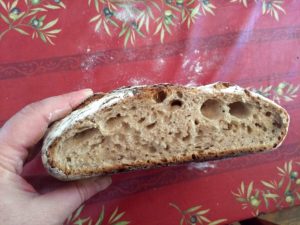
I decided to look for something simpler and ran across this recipe, which turns out to be based on this much simpler one. tl;dr: a basic rustic bread recipe that yields chewy crust and airy, holey insides, but can be made directly from active sourdough starter without an intermediate levain rise.

NOTE: this recipe is easy and fairly forgiving about timing, but it’s slooooooow.

What’s Active Starter?

Active starter is well-fed, bubbly, and at its peak of the day. I feed mine once a day and it peaks around 20-22 hours after I feed it. You can test for peak by putting a spoonful in a glass of water. If it floats, it’s ready. (If it floats then drifts downward a few seconds later, that’s a nope.)

There are one million guides to sourdough care and feeding around: you may want to read one. My method, after the sourdough is established is to feed it daily (at night) in a 1:1:1 ratio by weight of starter:flour:water.

Ingredients

This recipe makes a single loaf but you can double it easily.

  • 3 cups white flour (bread flour or all-purpose–I like to mix in about 1/4 cup each of rye and whole wheat flours)
  • 1 ¼ cups faintly warm water
  • 3/4 cup active sourdough starter
  • 1 tablespoon sugar
  • 2 teaspoons salt (regular, not kosher)

Equipment

  • A big mixing bowl.
  • A big mixing spoon.
  • A clean kitchen towel. (Or an oiled clean shower cap, or oiled plastic wrap if you must–but I use a towel.)
  • A dutch oven with a lid. (If you don’t have one, see the suggested cookie sheet method in the addendum.)
  • Cooking parchment (if you’re using the dutch oven method).
  • Optional but helpful: a rubber spatula.
  • A sharp knife to divide the dough if you’re doubling the recipe.

Timing Overview

  1. 5 minutes to mix.
  2. 5-10 hours for initial mix-and-rise. Only in the first hour or so do you really need to be interacting with the dough: the rest is pure neglect. I like to do the first 1-2 hours before bedtime, then go to bed and shape the dough early in the morning.
  3. 40 minutes for oven heating/loaf shaping.
  4. 45 minutes for baking (30 in the dutch oven, 15 on the oven rack)

Steps

  1. Mix all the ingredients in the big mixing bowl. I usually mix the water into the starter first, then add some of the flour, then the salt and sugar, then the rest of the flour, but if you mix speedily it shouldn’t matter. You’ll get a shaggy, sticky dough.
  2. Make sure you have mixed thoroughly enough that there aren’t any floury lumps lurking under the dough. Then try and use the spoon or a wetted spatula or your wet fingers to get rid of most of the sticky dough clinging to the edges of the bowl. (Anything you leave there will turn to cement over time.)
  3. Cover the bowl with a wet (wrung out) dishtowel or proxy (see Equipment) and set a timer for 20-ish minutes.
  4. Now you’re going to do the first of several stretch-and-folds that will happen in the first 1-2 hours of rising. I recommend three in this time period. The timing isn’t terribly sensitive, but they should be at least 15-20 minutes apart. The stretch-and-fold makes the dough stronger and smoother, without any actual kneading. It should take less than 30 seconds each time. A stretch-and-fold is basically reaching your wet hand under a section of the dough (you’ll do this four times, turning the bowl each time to cover the whole bowl), and pulling it gently and firmly up and over the rest of the dough. This will be tricky the first time and easier the next couple of times as the dough gets more coherent. There’s a great photo series of an initial stretch-and-fold here: https://littlespoonfarm.com/sourdough-bread-recipe-beginners-guide/ , and you can watch infinity videos on Youtube if you want more guidance. Cover the dough back up and leave it alone for a while.
  5. Do the stretch-and-fold another couple of times over the next hour and a half, whenever it’s convenient for you. If you want more rules about this, the Internet is full of very prescriptive advice, but this level of care works for me. Always cover the bowl afterward.
  6. Leave the dough alone until it is 2-3 times its initial volume and has at least a couple of small visible bubbles (1/2-inch diameter or bigger). Overnight is OK assuming you’re not sleeping in.
  7. Preheat the oven to 475: if you’re using a dutch oven, put it in the oven now, including the lid.
  8. Now you’re ready to shape the dough. Have some flour at your elbow as you do it, and flour a cutting board or your counter/table. Have a well-floured banneton (baking basket) or a piece of parchment paper ready to hold the shaped bread. Sprinkle a handful of flour over the edge of the dough you’re attacking first, and also make sure your hands are quite floury. Now, carefully pull the dough away from the edges of the bowl, sprinkling some flour on especially sticky parts if you need to. You want to remove the dough in a single mass* without disturbing its internal bubbles as much as possible, so don’t knead or squish it.
  9. Plop the mass on the cutting board and if necessary, clean and dry your hands. Then pick up the blob again with the most intact side upward, lightly flouring any gacky surfaces, and carefully pull the sides of the dough underneath to form a smoothish ball. This takes practice and it won’t be perfect at first but the bread will still be good! You’re aiming for some surface tension on the top and a bunch of slightly messy seams underneath.
  10. Transfer the blob seam-side down to a banneton or a piece of parchment paper, and cover it with a kitchen towel. Set a time for 30 minutes. (If you aren’t using a dutch oven, see the addendum.)
  11. When the timer goes off, remove the towel. If you used a banneton, cover it with a big square of parchment and invert it, thwacking the bottom of the basket so the loaf comes out cleanly. (If it doesn’t not the end of the world but next time flour it better.)
  12. Take the lid off the heated dutch oven and, holding the sides of the parchment, carefully and quickly ease the dough into the dutch oven. Then cover it. Use oven mitts! I burn myself a lot.
  13. Close the oven and bake for 30 minutes.
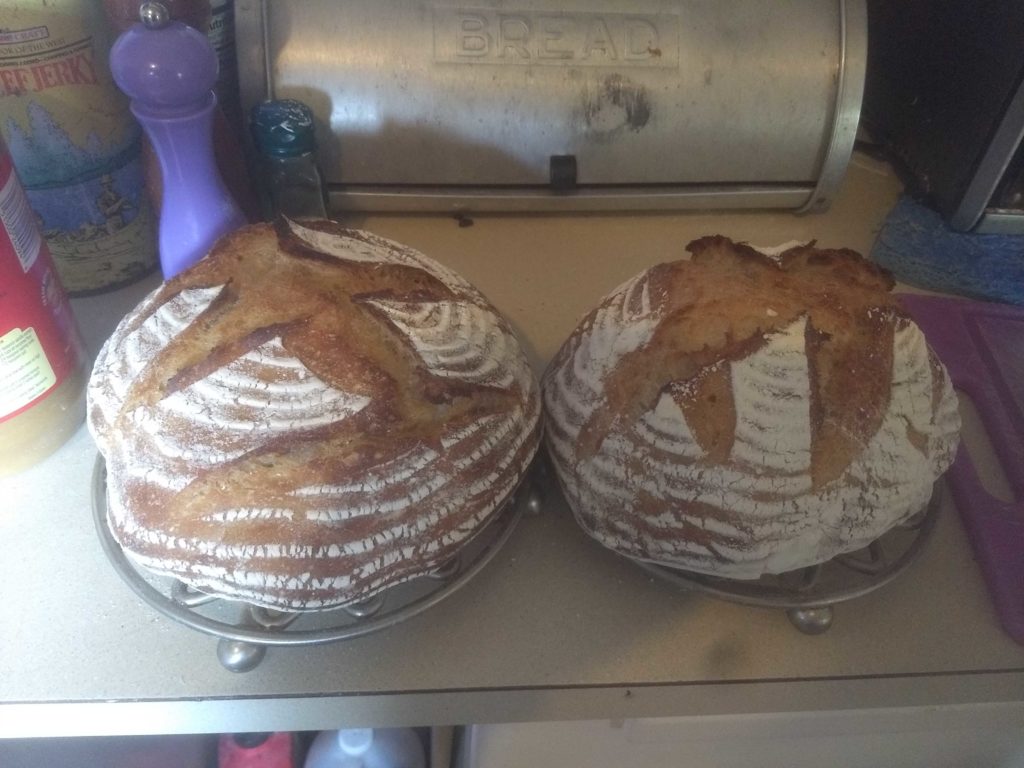
  14. Take the loaf out of the dutch oven and bake it on the oven rack for another 15. When it’s done, it will be a deep golden-brown and make a hollow sound when you tap the bottom.
  15. Let it cool before you eat it! Otherwise it will squish inside. You’ll probably have to test this a couple of times because your kitchen smells great right now, but if you want to preserve the full elevation of the bread don’t cut till it’s just faintly warm.

Addendum: No Dutch Oven Method

If you don’t have a dutch oven, modify the recipe from step 8 on as follows:

  • Use an oiled baking sheet instead of parchment, or put parchment directly on the baking sheet in lieu of oiling.
  • Just after you put the baking sheet in the oven, scatter a handful of ice cubes on the oven floor, or pour some boiling water into baking sheet set on the lower rack. Steam makes the crust.
  • You should still do step 14 so the lower crust gets direct heat.

So, You Want to Bake Bread

crusty bread with holes

There are a couple of things to know if you’ve decided to start making bread, and as someone who has been baking at home for a long time, here are a few of my idiosyncratic opinions and insights about it.

What do you need to make bread?

Here is a list of things you need to make pretty, tasty bread without pain and suffering:

  • Flour, water,  salt, yeast and maybe some other common grocery staples.
  • Measuring cups and spoons.
  • A bowl big enough to hold a bunch of dough. At least 4 quarts is good–you want room for 6 cups of dough and your hands, and then you also want room for rising. 
  • An oven. 
  • A kitchen timer or clock.
  • Some bread pans (if you want loaf bread). If you want rustic bread, a dutch oven is nice but not required. If you don’t have either, though, you can always bake free-form loaves on a cookie sheet or even in a foil pan.

Here are some things you might enjoy but don’t need. I rarely use any of them.

  • A bread machine, a food processor, or a mixer with a dough hook
  • A scale
  • An instant-read thermometer
  • Instant yeast
  • A razor blade tool called a lame for slicing the bread tops

There is no doubt that some people greatly enjoy the chemistry angle on baking, and that you can make your results more reliable by weighing everything to the gram and paying close attention to hydration and temperature and close timing. But you don’t need those things to make very good bread, and if you develop a knack for baking, you’ll eventually develop a sense of the look and feel of dough that’s a bit too wet or dry and what it needs.

Only you know whether you feel more comfortable being a kitchen scientist or a handy kitchen crone with bread magicks in your fingers, but even if you don’t end up being either your bread will be FINE. Provided you don’t kill your yeast (about which more later), your bread mistakes will almost certainly be more than edible, and indeed tastier than store bread.

Choosing a Recipe

Kneaded Versus No-Knead

Many people handwavily assume no-knead must be quick and low-effort, and kneaded bread is a slog. This isn’t really accurate. They require different timing and different kinds of work.

When considering kneaded bread, people tend to overestimate the labor of the kneading process. Kneading does take a little time–but the time is not HOURS. It’s around 7-10 minutes. Also, it’s fun to smack the dough around and pretend it’s your enemy’s head. You don’t have to be The Rock, either. 

Kneaded bread typically has a two-stage rising process that can be completed in a few hours,  during which you need to be around to stop the rising at the correct time. However, it’s not a life sentence. You can stick your dough in the fridge and get back to it later if you suddenly get invited to a fancy lunch when you were planning to stay home baking. Then bring the dough back to room temperature to shape it or bake it. 

When you make no-knead bread, you are free to leave your mixed dough in the fridge for literally days and days before shaping it, and you don’t ever have to knead it. However, you will still have to wait for a long slow initial rise (four hours to overnight), and you’ll still have to let the dough sit for 40 minutes to an hour after you shape it. 

And don’t underestimate the hassle of dealing with the heavy, wet, sticky doughs required for no-knead. You can fairly quickly develop a knack for handling these doughs, but they can make a big mess while you’re learning, or if you misjudge the hydration of the dough. That guy in the video tenderly stretching the dough and shaping it into a ball in about six seconds without leaving any sticky dough splotches anywhere on the floor or counters has been doing it for a long time.

What’s a Good Beginner’s Recipe?

For starters, you might as well pick a recipe based on whether you think you’ll like the bread. If you crave that crusty rustic bread with a crackling crust, make no-knead (for really crisp crust, you’ll want a dutch oven). If you want a soft sandwich bread or rolls or a nice sweet wheat bread with seeds in it or challah or dinner rolls, you probably want kneaded bread. I would suggest not starting with a recipe that’s heavy with sugar and eggs–these ingredients can delay your rise for a frustratingly long time, and they’ll make your dough heavier and sometimes harder to handle. But mix-ins like seeds or fruit or herbs or roasted garlic will not change your outcomes much, so if they’re exciting, there’s no reason not to try such a recipe as a beginner.

Next, look at the number of rises required by the recipe, as well as any preliminary stages (like making oatmeal, or mixing a sponge), before you commit. Some no-knead recipes want days of creating starters, levains, and other precursor science projects before you mix the main dough, and others want you to hang around doing stretch-and-fold tweaks to the dough several times an hour. This can result in amazing bread but you’re vastly increasing the number of variables between you and success, as well as your time and energy commitment. The very finest crusty breads are based on sourdough, which requires careful timing of phases and a fair amount of lead time [what’s the lead time for?].

This is my idea of a good starter recipe for no-knead bread: King Arthur No-Knead Crusty White Bread. It uses one bowl and has no preliminaries; it is quickly mixed with no further tampering, and it can handle sitting around in the fridge for days on end.

This is my idea of a good kneaded bread to start with: Easy Honey Oatmeal Bread. It has a very short “sponge” phase ( a sponge is a kind of risen batter that you mix and then let bubble before you mix the rest of the ingredients in and knead), but after kneading you just shape the dough and let it rise in the pans. So you can make it after dinner and still get to bed at a decent hour.

A Note on Yeast

Recent recipes tend to ask for instant yeast, which can be combined with dry ingredients rather than added to liquid to moisten. However, this shouldn’t limit your choice of bread recipes. Any instant yeast recipe should be easily translatable to regular yeast. Just add your yeast to the liquids the recipe calls for, stir for a couple of seconds, and let it sit while you gather your dry ingredients. Done. The wet ingredients should be mildly warm but not uncomfortably so. It’s OK to err on the side of coolness; your bread will catch up over time and rise, just a little slower.

Yeast packets contain about 2 and 1/4 teaspoons of yeast, and are a horrible ripoff at typically more than $1.50 a packet. Go to Costco and buy a lifetime supply (OK, not really, but about a pound) for $6–share it with your friends, and store it in a jar in your freezer for a year or more.

Go Forth and Bake

Whatever imperfect breads you bake in your own home oven have a high chance of being delicious. Very few home-baked yeast breads are even unpleasant, so you and your friends and family will likely enjoy eating your mistakes, and, eventually, your triumphs. Excelsior.


Easy Honey Oatmeal Bread

adapted from George Greenstein’s Secrets of a Jewish Baker.
This is a sweet, high-rising, soft bread that makes great toast and sandwiches.


Sponge

  • 2 cups warm water
  • 2 packages (4 and 1/2 teaspoons) active dry yeast
  • 3 cups unbleached all-purpose flour

In a large bowl, sprinkle the yeast over the warm water to soften it; stir to dissolve. Add the flour and stir till smooth. Cover with a kitchen towel and set aside for 30 minutes or till doubled.

Dough

  • 1/2 cup honey
  • 2/3 cup skim milk powder
  • 1 cup cooked oatmeal
  • 4 tablespoons unsalted butter, melted and cooled
  • 3 to 3 1/2 cups unbleached all purpose flour
  • 1 tablespoon salt

After the sponge has risen, stir it until it deflates and stir in the honey, milk powder, oatmeal, and butter. In a separate bowl, combine the salt and flour. Add the dry ingredients to the other bowl and stir the dough until it comes away from the sides of the bowl.

Turn the dough out on a floured board and knead it for about 8 minutes, adding small amounts of flour as you go to keep it from sticking to the board. The dough should be pushing back a little and have an elastic feel. Cut the dough in half and let it rest under a kitchen towel for ten minutes or so while you grease two loaf pans. To keep bread from sticking, I’ve been making a slurry out of flour and cooking oil and painting a thin layer on with a pastry brush–this seems to be no-fail for me. But you can try using butter or shortening.

Shape the dough into loaves (I flatten each piece into a rectangle longer than the pan, then roll first the long sides, then the short sides under, pinching the seams to seal them.) Put the loaves seam-side down in the pans and cover them with the towel. Let them rise until the loaves form rounded tops above the edge of the pans. This won’t take more than an hour.

Preheat the oven to 375. Put a broiler pan or some other kind of metal pan on a lower shelf, to hold water for steam. Also, put some water on to boil.

Slash each loaf lengthwise down the center with a sharp knife or a razor blade. Brush the surface with cold water. Right before you put the pans in, pour 3/4 of a cup of hot water into the pan in the oven to make steam, then quickly put the bread pans in and close the oven. This will give you a good crust.

Bake for 35 minutes, then take the loaves out of the pans and bake them on the oven rack for another ten minutes. Tap the side of the loaf: a done loaf will sound hollow. Cool the loaves on a rack.